Starting with Connect IQ version 3.1.0, developers have the ability to communicate directly with devices via the Bluetooth Low Energy wireless communication protocol. This has opened up a whole new world of possibilities for what can be done with Connect IQ. For the uninitiated, the setup process to get started can seem quite daunting. The purpose of this setup guide is to help lighten the load to get developers off the ground as quickly as possible.
Resources
When going through this guide, developers will want to keep a few things handy.
-
Connect IQ BLE API Documentation - Having the API Documentation close by will be critical (especially in the later steps of this document).
-
Nordic nRF52 DK - The Connect IQ team has built out the Connect IQ SDK tools to be compatible with the Nordic nRF52 DK Bluetooth 5 and Bluetooth mesh Development Kit for nRF52810.
-
Nordic Documentation Page - The Nordic Documentation has links to all of the resources needed to use the nRF52 DK.
-
nRF Connect For Desktop - The nRF Connect For Desktop application allows developers to flash new firmware to the board, monitor connections, etc. This software is necessary to program the board to work correctly with the Connect IQ simulator.
-
An up-to-date Connect IQ SDK - To use the BLE APIs, developers should be working with the current version of the Connect IQ SDK.
-
Firmware for the nRF52 DK or nRF52840 Dongle - The memory layout of the development board will need to be flashed to a different firmware for use with the Connect IQ SDK: nRF52 DK firmware or nRF52840 Dongle firmware
Windows
The drivers and applications needed to communicate with the nRF52 DK are all included in the installation of nRF Connect for Desktop for the Windows platform. Once this application is installed along with the necessary drivers, the nRF52 DK should be found by the nRF Connect for Desktop application.
At this point, proceed to the Using Nordic nRF Connect section.
Mac
When using macOS, developers will need to manually install the JLink/JTrace USB drivers to communicate with the nRF52 DK board. To do so, download and install the Segger JLink installer package 6.22g for Mac.
Once this is completed, developers will need to install the nRF Connect for Desktop for Mac.
At this point, proceed to the Using Nordic nRF Connect section.
Linux
When using Linux, developers will need to manually install the JLink/JTrace USB drivers to communicate with the nRF52 DK board. To do so, download and install using the appropriate Segger JLink installer for Linux:
- 32-bit: JLink_6.22g - 32
- 64-bit: JLink_6.22g - 64
Once this is completed developers will need to install the nRF Connect for Desktop for Linux.
At this point, proceed to the Using Nordic nRF Connect section.
Using Nordic nRF Connect
The nRF Connect Desktop application will need to be installed. Please see the above sections for the appropriate links.
-
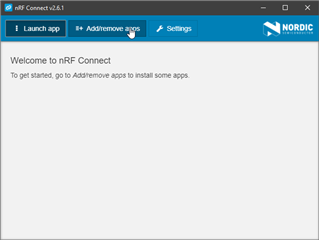
Once installed, launch the application. Click Add/remove apps
-
Install the Programmer app.
-
Plug in the nRF52 board.
-
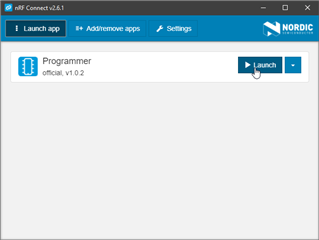
Launch the Programmer app.
-
Near the top left, click Select device.
-
Select the correct device.
-
Click Read to see the Memory Layout of the connected device.[12]
-
Drag and drop or click Add HEX file to prepare the desired Memory Layout with the proper
.hexfile.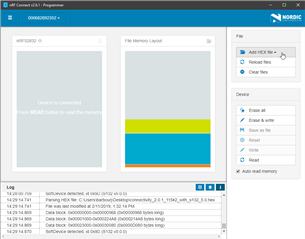
-
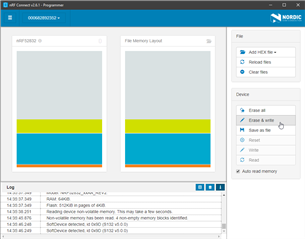
Click Erase & write to flash the new memory layout.
Finding The COM Port
Now that the board is properly communicating with the computer, it’s time to figure out which port it’s utilizing.
Windows
Open up Device Manager and find your device under Ports.
It will look something like this:

The communications port is listed in parentheses. In the example above the communications port is COM4. Copy this to be used in a later step and proceed to Setting the COM Port.
Mac
Open up a terminal and type:
ls /dev/tty.usbmodem*
then press Tab. This should list out the port information in the format /dev/tty.usbmodem<number>. Copy this to be used in a later step and proceed to Setting the COM Port.
Linux
Open up a terminal and type:
ls /dev/ttyACM*
then press Tab. This should list out the port information in the format /dev/ttyACM<number>. Copy this to be used in a later step and proceed to Setting the COM Port.
Setting the COM Port
At this point the nRF52 is properly communicating with the development environment and the com port information has been retrieved. The final step is to set the COM port in the Connect IQ Simulator.
-
Launch the simulator via Eclipse or command line tools.
-
Select Settings > BLE Settings
-
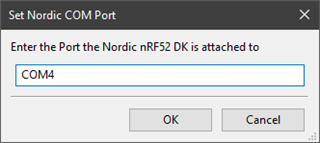
In the dialog box, enter the COM port information from Finding the COM Port.
-
Click OK.
It’s possible that developers might encounter an error. This is likely due to a failure to set the COM Port for the Connect IQ simulator. If an error occurs, then developers have a few things they can check.
- Double check the COM Port assignment: Follow the steps for the correct environment to find and confirm the COM Port.
- Ensure there are no copy/paste errors: Double check the information entered when setting the COM Port.
That’s it! If all goes well, then the Connect IQ Simulator will use the nRF52 DK board BLE chipset to communicate with nearby BLE devices per the Connect IQ Bluetooth Low Energy APIs. For more information on the APIs, please refer to the API documentation and sample applications included in the Connect IQ SDK.
