
Showcase and Forum for MapIT Datafield
Feedback, Suggestions, Questions? Here's the place to let me know :-)
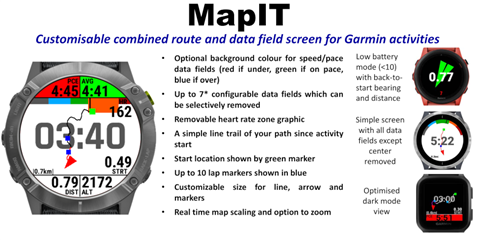
An offline trail mapping Data Field screen designed primarily for watches without inbuilt mapping capabilities such as the Vivoactive and Venu series, but works on most of the Forerunner and Fenix series as well. No phone connection required! This datafield only shows the path already travelled, it does not show pre-downloaded routes or provide waypoint navigation other than back to start.
Features:
- Activity start location as a green square
- A simple line trail of your path since activity start (last minute of activity shown by red line)**
- Your current position and bearing shown with a red arrow
- A maximum of 10 laps shown by blue squares. (Due to memory constraints, after 10 laps, the oldest saved lap will be overwritten)
- Up to 7* configurable datafields
- Optional HR Zone graphic with current zone enlarged and heart rate in zone indicated by line on graphic
- Current map scale in km
- Optional background colour for speed/pace datafields (red if under pace, green if on or above pace)
- Different configuration options for 3 different activities (run,bike and other)
- The map is North-up orientated and will rescale to keep the entire activity in-screen at all times
- Zoom feature: pressing the lap button twice within 10 seconds will zoom in on the current location for a 20 second duration (These "lap" instances will not be displayed on the map by the blue squares, but will regrettably be saved into the .fit file and show on other datafield screens. If undesired, the zoom feature can be disabled in settings)
- Datafields can be hidden in settings by setting to "None" to make the map full-screen
- Datafield only supports single field view
*5 datafields on smaller devices such as Vivoactive 4s. Forerunner 735xt is limited to 4 due to screen shape and size
** A note on the trail...memory constraints allow for a maximum of 200 GPS coordinates to be stored. These are continuously parsed to allow for data to be stored throughout the duration of the activity. This means that as an activity progresses, saved coordinates have a longer interval between them. For example, at activity start, coordinates are saved every 2s, at 15 minutes they are saved every 8s, and by two hours coordinates will only be saved every 1 minute. Thus, the line will lose detail over time, and may show as a sequence of straight lines when you zoom later in the activity, rather than a detailed curve.
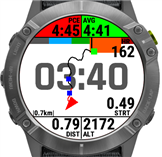
Large device (260x260) with all datafields configured
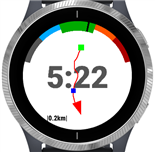
Zoomed view shown when lap button is pressed twice within 10 seconds
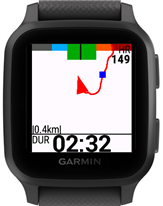
All datafields except center disabled to show full-screen map view with HR zones graphic
Configurable datafields include:
- Setting to None to hide field
- Current Pace (min/mile or min/km defined automatically by watch pace settings)
- Average Pace
- Current Speed (mile/hr or km/hr defined automatically by watch pace settings)
- Average Speed
- Lap Pace
- Lap Speed
- Current Cadence
- Average Cadence
- Elapsed Time
- Lap Time
- Distance (miles or km defined automaticaly by watch distance settings)
- Lap Distance
- Heart Rate
- Lap Count
- Altitude (feet or meters defined automatically by watch distance settings)
- Total Activity Ascent/Descent (feet or meters defined automatically by watch distance settings)
- Distance to Start
- Clock
- Battery Percentage
Installation Instructions:
This is a ConnectIQ Data Field not an app. After installation, navigate to the Garmin activity app that you want this datafield to display for, such as Run, Bike, Walk etc. Before starting the activity, open settings, select "Data screens", select the desired data screen you want to display this datafield on (screen 1, screen 2...). Set layout to 1 field, then select "Edit Datafield" and look for MapIT under the ConnectIQ fields.
How to change settings:
See: forums.garmin.com/.../changing-connect-iq-app-settings
There are many Youtube videos that will demonstrate how to change the settings for a ConnectIQ data field, and it is recommended to have a look at these if you are confused.

