Change the device for Run without Debugging in Visual Studio code

Hello,

first time I run the application in VS code it asked me the device and opened a simulator. Now the command automatically selects the same device. How should I change the device to test on another Garmin device?

Thanks

Top Replies

All Replies

  • Use the command palette (CTRL-SHIFT-P / CMD-SHIFT-P) and select "Monkey C: Build Current Project". You'll be prompted to select a device, and that will change the default for the next run.

  • I see a list of devices when I select "run without debugging", even when my app is already running in the sim.  I'm on Win11, and the way I set the app is using the highlighted icon on the left and the pick the app by way of the "Run App" pulldown.

  • If you want to run in "Release" mode as opposed to" Debug" mode in the Sim you have to add "-r"  to the run command, via Extension > Extensions Settings > rightClick Monkey C > Compiler Options. (And then remember to remove for later debug sessions)

  • I see a list of devices when I select "run without debugging", even when my app is already running in the sim.  I'm on Win11, and the way I set the app is using the highlighted icon on the left and the pick the app by way of the "Run App" pulldown.

    Yes, that's what'll you see if you create a launch.json file with a Monkey C config.

    - Click on the Run and Debug icon in the sidebar (CTRL-SHIFT-D or CMD-SHIFT-D)

    - Select "Create a launch.json file" (if that option is available), or select the dropdown which should read "No configurations" 

    - Select "Monkey C"

    Once you do that you'll be prompted every time you run.

    I actually prefer the other way better (since it remembers my last choice), although they both have their pros and cons.

    BTW, you can just press CTRL-F5 to do the same thing (Run without Debugging) - if you're in a multi-root/project workspace, the project of the last focused editor will be selected. (In this case it's the same shortcut on Windows and Mac -- i.e. the Mac shortcut is *not* CMD-F5)

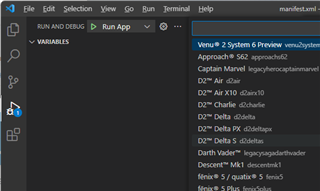
  • The way I do it kind of remembers the last choice as it's always at the top of the list.

  • If you want to run in "Release" mode as opposed to" Debug" mode in the Sim you have to add "-r"  to the run command, via Extension > Extensions Settings > rightClick Monkey C > Compiler Options. (And then remember to remove for later debug sessions)

    This is the kind of thing that is ideal for scripting IMO - it's a boring, repetitive/rote, error-prone task.

    Here's a script for macOS that will build the release version of your app (as bin/PROJECT_FOLDER_NAME-release.prg), launch the simulator, and the run the app. 

    Installation:

    1) Go to this link  [https://pastebin.com/PYTy2yvJ], click "raw", copy all the text and use an editor like VS code to save it to a file named ciq-release.sh in your home folder.

    (Unfortunately the forum won't let me post the code here.) Do not download the file as this causes a formatting issue.

    2) Copy ciq-release.sh to /usr/local/bin e.g.

    sudo cp ~/ciq-release.sh /usr/local/bin

    3) Run the following command to give the script executable permissions

    sudo chmod ogu+x /usr/local/bin/ciq-release.sh

    Usage:

    - From the root folder of a monkey C project:

    ciq-release.sh DEVICE

    e.g.

    ciq-release.sh fr255

    You could open a terminal in VS Code (CMD-J) and run this script whenever you want. You could even tweak the script to easily select between release and debug.

    Having said that, I wish there were a simpler way to toggle debug/release in VS Code, like separate debug/release project configurations.

  • Great script. Thanks. I downloaded it. To some extent, better than my makefile included in per project TBH.