

Developers live and die by their tools. A development environment for a software developer is like a video editing suite to a video editor; it's the tool of creation. Any change in that tooling can be very disruptive when you're familiar with what you have.
For those of you who have used the Eclipse environment over the past few years, Visual Studio Code can be an adjustment. In developing the new extension, we have taken the philosophy of trying to make something that would feel natural to a Visual Studio Code user. This can be alienating to developers moving from Eclipse, which has its own philosophy and approach. Though we are continuing to maintain the Eclipse solution, any new features going forward will only go to the Visual Studio Extension.
Let’s talk through some of the changes between Eclipse versus Visual Studio Code, and how the two environments are the same but different.
Projects, Workspaces, Folders, and Windows
In Eclipse, the workspace is set at startup and is the directory on disk where your projects and your Eclipse settings live. You cannot change your workspace folder without restarting Eclipse. A project is a collection of related resources, but the Monkey C plugin usually represents the root folder of a source code tree. While you can have just one project in your workspace, it is more common to have multiple (even unrelated) projects all within the same workspace.
In Visual Studio Code, a window is an instance of the Visual Studio code environment. A folder is the root directory of a collection of related resources, but with the Monkey C extension a folder usually represents the root folder of a Monkey C source code tree. A project is a collection of folders but is not a subdirectory on the file system like in Eclipse. It is very common in Visual Studio code for a single project to have its own workspace, but it is also possible to have multiple folders in a workspace. You can have multiple windows editing multiple projects with multiple folders open at the same time.
Eclipse has a feature of linked folders, where a source folder can be soft-linked into a project. The Visual Studio Code extension does not mimic this feature, but you can add paths to the sourcePath or resourcePath of base in your jungle file to bring in folders. See the Jungle Reference Guide for details.
Workspace Settings Versus Project Settings
In the Eclipse plug-in there are two sets of settings: workspace settings and project settings. The workspace settings allow configuring the plugin. You can also edit the project settings for a Connect IQ project itself.
Visual Studio Code also has a separation of extension settings and folder settings. The extension settings allow for configuration of how the extension interfaces with the SDK, while the folder settings allow configuring the jungle, manifest, and type check level for the folder.
Connect IQ Menus Versus Command Palettes
The Eclipse plug-in adds extra Connect IQ specific options by adding a Connect IQ menu to the Connect IQ perspective:
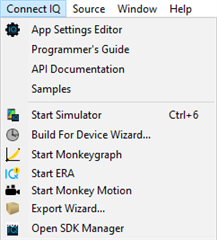
With the Monkey C extension, the commands have been added to the command palette, which can be summoned with Ctrl + Shift + P (or Command + Shift + P on the Mac). You can see all the extension commands by typing “Monkey C”:

The command palette auto-complete filters on all words in the command, allowing quick access to tools.
Manifest Editing
One of the most important files in the Connect IQ project is the manifest.xml file, which provides important metadata like the supported products, app type, and permissions. In the Eclipse plug-in, there is a special editor that breaks down the manifest into its component parts.
With the Monkey C extension, you can use the following commands to edit the manifest:
|
COMMAND |
DESCRIPTION |
|
Monkey C: Edit Products |
Edits the products in the manifest.xml; only allows selecting products that support the minimum SDK version |
|
Monkey C: Edit Permissions |
Edits the permissions in the manifest.xml |
|
Monkey C: Edit Languages |
Edits the languages in the manifest.xml |
|
Monkey C: Edit Application |
Edits the application metadata (name, label, identifier) in the manifest.xml |
|
Monkey C: Configure Barrel |
Wizard to add or remove Monkey Barrels from your project |
|
Monkey C: Set Products by Connect IQ Version |
Allows mass selection of all products that meet a Connect IQ version |
|
Monkey C: Edit Annotations |
Allows adding new annotations to Monkey Barrel projects |
|
Monkey C: Regenerate UUID |
Creates a new application UUID for your project |
Documentation and Tools
The Eclipse plug-in Connect IQ offered links to the Connect IQ SDK documentation and tools. The Monkey C extension does as well via the following commands:
|
COMMAND |
DESCRIPTION |
|
Monkey C: Open ERA Viewer |
Opens the Error Reporting Application tool |
|
Monkey C: Open Monkey Graph |
Opens the Monkey Graph tool |
|
Monkey C: Open Monkey Motion |
Opens the Monkey Motion tool |
|
Monkey C: Open SDK Manager |
Opens the Connect IQ SDK Manager |
|
Monkey C: View Documentation |
Provides access to all the Connect IQ SDK documentation |
Build Configurations Versus Launch Configurations
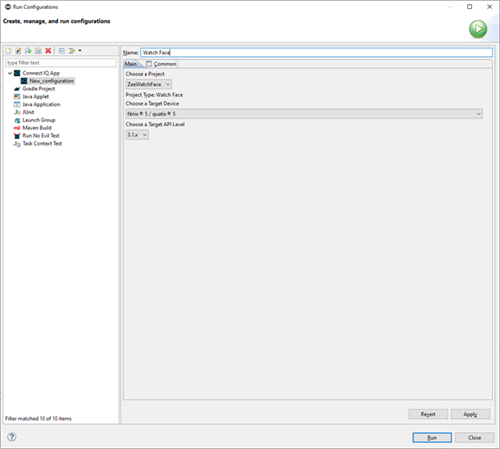
In Eclipse, you can create a run configuration for any project in your workspace. Run configurations allow you to create a custom project configuration for how to build or run your application. The Connect IQ plug-in allows you to create configurations that launch a specific project in the simulator with a specific device:
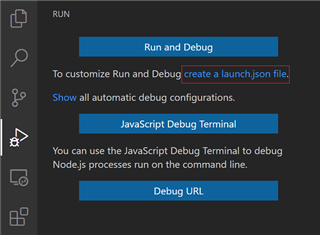
Visual Studio Code allows you to set and create launch configurations using the launch.json file. To create a launch.json file go to the Run start view and click create a launch.json file:
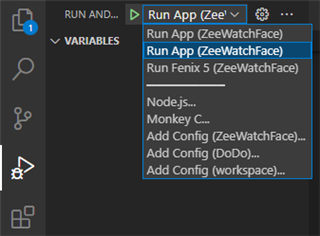
By default, the Monkey C extension will create two launch configurations for a project: one to run your app and one to run your tests. The default run task will ask you which device you want to use when you run or debug, but you can create a custom launch configuration with a preset device. The easiest way to add a launch configuration to a launch.json is to go to the last configuration and type Ctrl-Space:

Customize the configuration by setting its name, the device, and if it stops on launch when debugging by default. Once you have added a configuration, you can set the current launch configuration in the Run and Debug view. This configuration will be launched with the when you start debugging or run without debugging:
App Settings
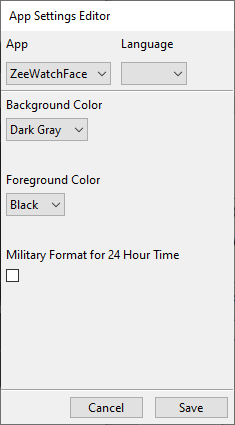
The Eclipse plug-in provides an app settings editor that allows you to alter app settings for your app in the simulator:

With the Visual Studio Code extension, you can use the simulator to edit your app settings. After starting your application in the simulator, go to File > Edit Persistent Storage > Edit Application.Properties data to bring up the editor:
Side Loading Applications
Once you are ready to test your app on a device it needs to be sideloaded. With the Eclipse plug-in, you used the Build for Device Wizard from the Connect IQ menu to create a PRG executable:
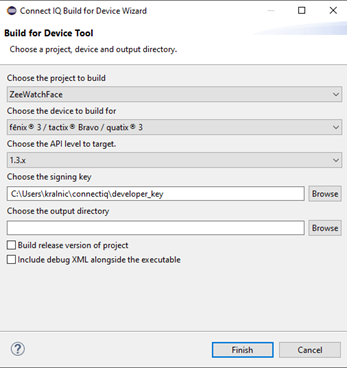
In the Monkey C extension, you use the command Monkey C: Build for Device. You’ll be asked which device to build for from your manifest, and the export directory for the PRG file.
Exporting Applications
When you’re ready to upload your app to the store you need to export it as an IQ file. In the Eclipse plug-in you would use Export Wizard. In the Monkey C extension, you use the Monkey C: Export Project command. After setting your export path it will build the IQ file.