

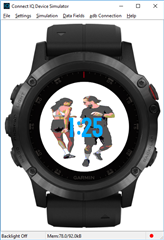
Monkey Motion, the new animation feature available in Connect IQ 3.1, allows developers to import animated content into their Connect IQ apps. In this post we will discuss how to import an animation, how to use the new WatchUi.Layer to overlay content onto the animation, and best practices for using this new feature. Our end goal is to make a watch face with a little action when you check the time.
Getting Started
To begin with, make sure you have downloaded the Connect IQ 3.1 beta and plug in. We will create a project called DanceDanceGarmin in Eclipse. You can download the example on GitHub.
Importing an Animation
The Monkey Motion tool can be launched from the Eclipse plug-in.
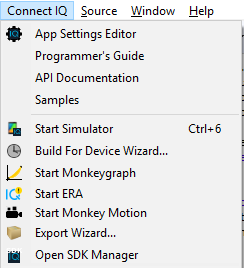
Clicking on Start Monkey Motion will open the tool:
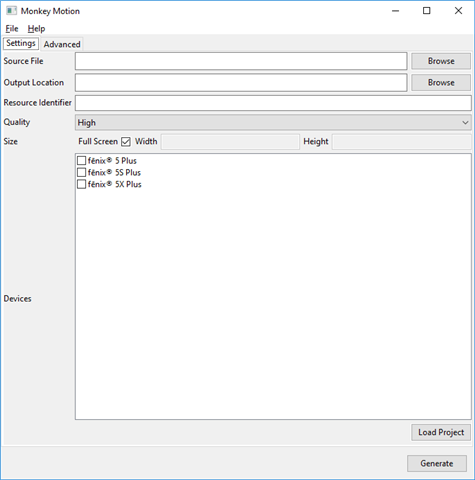
Monkey Motion accepts input from files in animated GIF or yuv4mpeg format. GIFs, a file format that is a millennial, has been used by users from the Compu-serve era to the messaging revolution. The yuv4mpeg format, which is far less known, is a very simple text-based raw format for video content. The advantage of the yuv4mpeg over GIF is that GIF will pre-palletize your colors, potentially lowering your import quality before it comes to Monkey Motion. If you care about such things, convert your content to YUV before importing, otherwise you can forget this paragraph and move on with your life.
In our case we will creating a watch face with this GIF:

In our case we want to download the higher quality MP4 version. As all good command line junkies we will do this with cURL.
curl https://media.giphy.com/media/1BceylguiTgc94R5pq/giphy.mp4 > Dancers.mp4
To convert to YUV, we will get the open source tool ffmpeg. ffmpeg is the Swiss Army knife of media file formats.
ffmpeg -i Dancers.mp4 -f yuv4mpegpipe Dancers.yuv
Let’s create an asset folder in our eclipse project, and have Monkey Motion put the output file there. We will also use the medium conversion quality, and use dancers as the resource identifier:
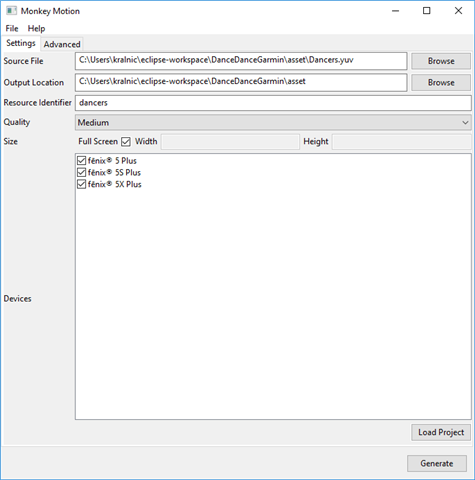
The Monkey Motion tool will generate files for every device selected in the devices list and output a Monkey Motion Manifest (.mmm) file that maps which file maps to which product. It will also output a resource XML file in the output directory.
When you click Generate Monkey Motion will churn and provide a viewer to watch the sample output:
The MIP displays used by the Garmin wearables are limited to 64 colors, so color loss is expected.
Monkey Motion and Monkey C
Now that the animation has been converted, we want to have our project import it, so we add the asset path to our jungle file.
project.manifest = manifest.xml

base.resourcePath = $(base.resourcePath);asset
This makes it a reference-able asset within your code.
Connect IQ 3.1 introduces the WatchUi.Layer class. Layers are buffered bitmaps that can be stacked on top of each other within a View. During a screen refresh, layers will be combined behind on top of the View to compose the view. In our case, we want to have two layers.

We will be using this animation logic for both the watch face and the goal view, so let’s put the animation logic in its own class, DanceDanceAnimationController. Creating the Animation from resources is very straightforward.
// Initialize the Animation
_animation = new WatchUi.AnimationLayer(
    Rez.Drawables.dancers,
    {
        :locX=>0,
        :locY=>0,
    }
);
Note that dancers is the resource identifier we provided to Monkey Motion. Now we want to create the overlay layer. Remember that the layer is a buffered bitmap, so the larger it is the higher the cost against your app memory. We’re going to make it large enough for a readable time, but not much larger.
// Function to initialize the time layer
private function buildTextLayer() {
    var info = System.getDeviceSettings();
    // Go for 60% width x 30% height.
    // Word aligning the width and height for better blits
    var width = (info.screenWidth * .60).toNumber() & ~0x3;
    var height = info.screenHeight * .3;

    var options = {
        :locX => ( (info.screenWidth - width) / 2 ).toNumber() & ~0x03,
        :locY => (info.screenHeight - height) / 2,
        :width => width,
        :height => height,
        :visibility=>true
    };

    // Initialize the Time over the animation
    var textLayer = new WatchUi.Layer(options);
    return textLayer;
}
Let’s add the two layers to the view.
view.addLayer(_animation);
view.addLayer(_textLayer);
Now it’s time to draw, um, the time. Rather than setting values in Drawable objects, we will draw the time directly onto the Layer using direct calls to the device context.
// Update the view
function onUpdate(dc) {
	// Clear the screen buffer
    dc.setColor(Graphics.COLOR_WHITE, Graphics.COLOR_WHITE);
    dc.clear();
    // Update the contents of the time layer
    updateTimeLayer();
    return;
}
Now, let’s play our animation. We’re going to keep a state variable that keeps track of if we’ve already started playing our animation.
function play() {
    if(!_playing) {
        _animation.play({
            :delegate => new DanceDanceAnimationDelegate(self)
            });
        _playing = true;
    }
}

function stop() {
    if(_playing) {
        _animation.stop();
        _playing = false;
    }
}
DanceDanceAnimationDelegate is a subclass of WatchUi.AnimationDelegate that calls stop once the animation completes playback.
class DanceDanceAnimationDelegate extends WatchUi.AnimationDelegate {
    var _controller;

    function initialize(controller) {
        AnimationDelegate.initialize();
        _controller = controller;
    }


    function onAnimationEvent(event, options) {
        switch(event) {
            case WatchUi.ANIMATION_EVENT_COMPLETE:
            case WatchUi.ANIMATION_EVENT_CANCELED:
                _controller.stop();
                break;
        }
    }
}
Finally, lets trigger our playback on onExitSleep of our watch faces. This will start the animation whenever the user gestures to read the time.
// The user has just looked at their watch.
// Timers and animations may be started here.
function onExitSleep() {
     _animationDelegate.play();
}
Add Life to Your Apps
Monkey motion makes it possible to add visual sizzle to your Connect IQ apps. Now you can create animations using your favorite tools, import them into your project, and have them play when you want.