
When I am in Basecamp on my desktop I delete tracks from internal storage - but when I plug in my unit the next time they are still there listed in Basecamp (but are not on the unit)!
When I am in Basecamp on my desktop I delete tracks from internal storage - but when I plug in my unit the next time they are still there listed in Basecamp (but are not on the unit)!

I am still at a loss to understand why a route you have named "Grayswood to Sussex" appears in the list contents box as "South Coast OS 1.25k". What is the icon next to this name?
This might help:
1. Down at the bottom of the screen, just to the right of the search box there is a blue filter symbol.
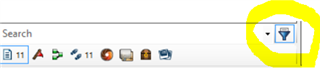
This toggles the counters of all the file types in the list or folder that you are viewing. Click to toggle the counter on and then click the left hand icon that looks like a sheet of paper to display all file types in the list. For example, in this list I just have eleven tracks in the list and nothing else.

2. If you filter this by clicking the Birdseye Imagery icon, this will just show you your "South Coast 1:25k OS" BirdsEye Select mapping
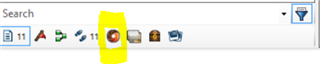
3. If you filter this by clicking the Routes icon, this will just show the routes in the list.

When you create or plot a new route and name it in a list folder, the number of routes in that folder will increase by one. As you can see I have just added a route to this list.

4. So clicking on the Routes icon will only display the routes in the box above and you should see your "Grayswood to Sussex" route.
5. If you connect your 66s, you can then right click the route and select the fourth option to Send the route to the Internal Storage folder of your device. No renaming is required.
If you are still having this problem you need to include some screen shots.
You may well find the BaseCamp tutorial by New England Riders helpful: https://www.newenglandriders.org/learn-basecamp/
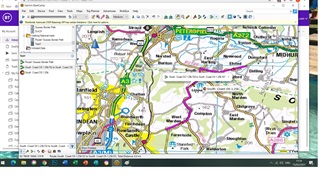
This is more or less what you should be seeing. I have created a list called My Routes. In that list I created two Waypoints called "1-Start" and "2-Finish" and plotted a simple route between them named "Limpsfield Common". This list also contains BirdsEye Imagery, which I have named "South Coast 1-25k OS".

When you attach your 66 device and have sent the four items to the Internal Storage, if you click on the Internal Storage you should see the same four items with the same icons and names. No renaming is involved.

If you are seeing something different, please post some screen shots like these!
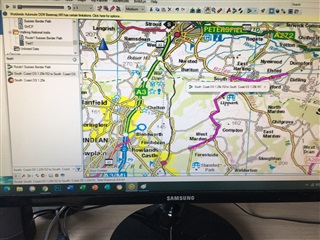
Hi Eyelet99. I am not sure why this image comes out small. I don't know much about how to do screenshots and save them. I have pressed "printScreen" and then the only way I know to save it is to paste it into "Paint"!
You will see (If you can see it!). that I have created a route in Walking National Trails, Test 1 (list file name). I didn't use any waypoints, but just drew the route onscreen in Basecamp. It appears in the bottom pane as "South Coast OS 1.25..."
Before doing it I copied and pasted my Birdseye mapping into the list folder, the section of mapping named "south Coast".
I have taken a picture of screen with phone and pasted it into here - but still not very clear for you to see!
I am having a look at the website you recommended. Sorry to keep bothering you. Thanks so much for your help. Best wishes,.
Okay, that's helpful and I can click to enlarge them to see the images and I think I know what is going on!
You have a List Folder called "Walking National trails" - this is a folder of Lists.
In this List Folder, you have created two Lists: one called "Route 1 Sussex Border Path" and the other "Test1". Think of a List as a subfolder which contains routes, tracks, waypoints, BirdsEye Imagery, Custom Maps etc.
Copying and pasted your "South Coast OS 1.25k" Birdseye mapping into the List "Test1" is fine.
In List Test1 you have created a Route called "South Coast OS 1-25 152 to South Coast OS 1-25 161". Note that the route is not named Test1, - Test1 is the List name containing the route. BaseCamp has taken the default name from the name of the starting via point (South Coast OS 1-25 152) and the end via point (South Coast OS 1-25 161), since it expects you to rename it.
You can rename "South Coast OS 1-25 152 to South Coast OS 1-25 161" simply by right clicking and choosing Rename and it will keep this new name. If you edit the List name, you just change the name of the List, no name changes occur to its contents.
Also, if you double click on the "South Coast OS 1-25 152 to South Coast OS 1-25 161" route you will open the Route dialog box and can see all the via points you have used and their names (running from 152 to 161). You can also rename the route here by editing the name and change the Activity Profile. Route points can be changed to shaping (non-alerting points) also. To save your changes, just click the top right X.
When you click the Route icon to start plotting a new route, BaseCamp assigns the next via point and names it by default to the map name plus the next incremental number. As you add more points to your route, the numbers increase. Since you routinely rename the route this doesn't really matter. But by now you should understand that creating a list, then creating a route are independent in terms of names.
Another way you can create a route is to click the New Track icon and plot a new Track. The default name will be Track 1 and should be renamed as above. This track can be converted into a route by right clicking the track and choosing "Create Route From Selected Track". All the via points in this route will be non-alerting shaping points (because they are derived from track points) but you can right click on any point and change it to an Alerting point. This is useful if you download someone else's track and you want to easily create a route from it.
If you don't need the track to be routable with alerts, it is simpler just to plot them as Tracks, which is what I mostly use.
Hope this helps!
Oh that's so helpful - thank you so much eyelet99. I have printed that out and devoured it! - have read it so many times. Just a few points - you don't have to answer if you are fed up with me!!
1. When I double click on the renamed route for the properties box each point is still shown as South Coast OS. Not important I suppose.
2. As the numbers follow on (from the previous route done I think) I take it that if you delete an old route then those numbers are just missing, as the next route has already been numbered.
3. You said that also in this route dialog box you can change the activities profile - how is that done?
4. So should I send the list file to internal storage, or just the route which shows in the bottom pane?
5. I have discovered that you can have more than one route in a list file - I presume that this is when you want to see more than one route on the screen. Do people normally do that?
6. I will try doing the tracks - I went on a course last March where we did outdoor stuff and classroom stuff. They definitely didn't encourage us to do tracks! But if you can convert them to routes, and also change any point to an alerting point (I presume this is where you get a tone), then that seems easy.
7. Oh and just one more thing - in the route dialog box how do you change route points to non-alerting points, as you mention?
Well I'm glad it has helped!
1. Once the via points are in the route file I don't think you need to worry to much about the names.
2. Yes I think so, but it doesn't matter as the route has been erased.
3. In the route dialog box, to the right of the track name is a dropdown list with all the activities for you to select. The activity selected changes how the route is calculated and routed, just like a car satnav when you tell it you don't want to use motorways.
4. If you send a list folder to your device, it will send everything in that list folder. If you only want to send a single route then just send that route in the lower contents pane. If you have more than one route you want to send, then you can select the ones you want with Ctrl-click and send them as a group.
5. I have list folders with over 100 tracks, several BirdsEye files and several waypoints, so yes, it is standard practice to put more than one route or track in a list folder. It is just a storage folder. You could put just one route per list folder, but it doesn't make sense to do so - collecting them in groups in list folders is more efficient..
6. If you create a route, all the via points are alerting, so if you try the tracks method, you have more work to do to turn some of them into alert (beep tone) points, but you can put the alerts where you want them. The via point status is shown next to its name.
7. Select a track point and right click. Fourth down is the toggle between Alert on Arrival / Don't Alert on Arrival (shaping point).
thanks so much eyelet99 - SO HELPFUL - now all I need to do is practice! I can't promise I won't be back at some point! Best wishes, Dazzy in England. I wonder whether you are over the other side of the world. How amazing these forums are!
Glad to have helped you Dazzy and yes - practice, practice ... also don't forget to make backups of BaseCamp as soon as you accumulate planned routes and walked tracks that you want to keep. Backups will include your BirdsEye Imaging. I am also in England but probably a bit further north from where you are.
Oh thank you - I was going to put my next question to the group - but now I see you have replied, - how do I do backups? - (on a separate hard drive do you mean?) Also - I am now learning how to insert points on a route in Basecamp (following gpstraining.co.uk videos), but once you insert one point you cannot insert another without it joining the two. I have clicked hand tool in between, and then clicked on "insert" again, but doesn't seem to make any difference. Thanks. Best wishes, Dazzy.
You can back up all data, lists, and folders to a single archive file.
Remember that a route is a set of via points connected by lines, hence you cannot create an independent waypoint in a route.
If you want to create a standalone Waypoint, click the Red Flag icon - New Waypoint tool and click on the map where you want it to be. Then go back to the Hand tool. Click your new waypoint and rename it, then choose your symbol from the dropdown list. It will be created in the List.
If you create two such Waypoints - one at the start and one at the finish, you can use another method of creating a route. Click the New Route icon and simply dragging the start waypoint into the Start box, and then the finish waypoint into the Destination box. Choose activity type and click Go.