This discussion has been locked.
You can no longer post new replies to this discussion. If you have a question you can start a new discussion

New Gear Date - Why can't I edit this?

Why can't we edit the date for new gear? I see posts going back 5 years asking this question so its a known issue. What's the point of locking this field?
  • At least I would like Garmin to explain the reason why this cannot be corrected

    Whatever the reason is, it won't help you. I would simply remove the wrongly added gear, and reenter it with the right date. If you use the checkbox for adding automatically at bike activities, at the end of the process, (if I rememebr well), it asks you whether you want to have the gear added also at past activies (from given date). In this way you'll ad the gear in bulk quickly and simply. Do not forget to disable the checkbox afterwards, or to retire the gear.

  • If you have Chrome, you can using developer tools.

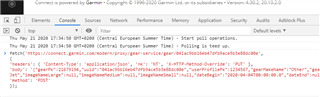
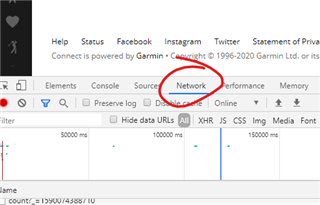
    Hit F12. Go to "network" in the bottom pane.

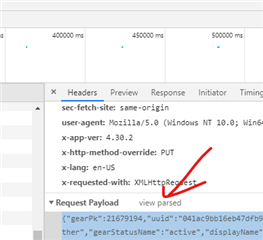
    Go to the page of your gear. Take note of the code of your gear in the location/address bar of the browser. it is 32 characters and looks something like 041ac9bb16eb47dfb9ace5b3e88dc00e. Save that.

    Change something arbitrary, like adding a . to the name of the gear.

    See how a couple of entries add to the bottom in the "network" pane. The first one that is added is the save action. It should look like the 32 characters of the code of your gear. There are also entries below it for each gear item that you have, as after your save click it will reload all your gear on the page. Click on the first one, i.e. the one that just has the 32 characters.

    On the right, after clicking, you see a new pane. scroll to the bottom to "request payload". Click on "view source" there (text changes to "view parsed").

    Then copy that string in that section that looks like this to a text editor (notepad):

    {"gearPk":21679194,"uuid":"041ac9bb16eb47dfb9ace5b3e88dc00e","userProfilePk":1234567,"gearMakeName":"Other","gearModelName":"Other","gearTypeName":"Other","gearStatusName":"active","displayName":"bont, jet bont","customMakeModel":"Bont Jet","imageNameLarge":null,"imageNameMedium":null,"imageNameSmall":null,"dateBegin":"2020-04-04T00:00:00.0","dateEnd":null,"maximumMeters":0,"notified":false,"createDate":"2020-04-19T18:22:04.0","updateDate":"2020-05-21T15:23:38.834Z"}

    Change the date in this string "dateBegin" to your desired date.

    Go to "console" in the bottom section of the developer tools in the browser. It is located next to where you clicked "Network" before.

    modify below code (in another text editor window / notepad), where you replace YOURUUID with the 32 character string mentioned above, and THESTRING with the code where you added that date; mind the quotes! they are important and shouldnt be curly quotes so don't use Word or something fancy. use Notepad!

    fetch('connect.garmin.com/.../YOURUUID',
    {
    'headers': { 'Content-Type': 'application/json', 'nk': 'NT', 'X-HTTP-Method-Override': 'PUT' },
    'body': 'THESTRING',
    'method': 'POST'
    }); 

    For example:

    fetch('connect.garmin.com/.../041ac9bb16eb47dfb9ace5b3e88dc00e',
    {
    'headers': { 'Content-Type': 'application/json', 'nk': 'NT', 'X-HTTP-Method-Override': 'PUT' },
    'body': '{"gearPk":21679194,"uuid":"041ac9bb16eb47dfb9ace5b3e88dc00e","userProfilePk":1234567,"gearMakeName":"Other","gearModelName":"Other","gearTypeName":"Other","gearStatusName":"active","displayName":"bont, jet bont","customMakeModel":"Bont Jet","imageNameLarge":null,"imageNameMedium":null,"imageNameSmall":null,"dateBegin":"2020-04-04T00:00:00.0","dateEnd":null,"maximumMeters":0,"notified":false,"createDate":"2020-04-19T18:22:04.0","updateDate":"2020-05-21T15:14:28.870Z"}',
    'method': 'POST'
    }); 

    Copy above command into the console.

    hit enter.

    refresh the page of your gear. If you did everything right, you'll have a new start date.

  • This worked great for me, except doing it manually in the console didn't for some reason, I assume something related to sending the right cookies or authentication headers.

    What I ended up doing was after doing the save step, I found the POST in the Network tab, right-clicked it and selected Edit and Send, then just edited the data in that form that appears and then hit Send.

    Thanks